 Save
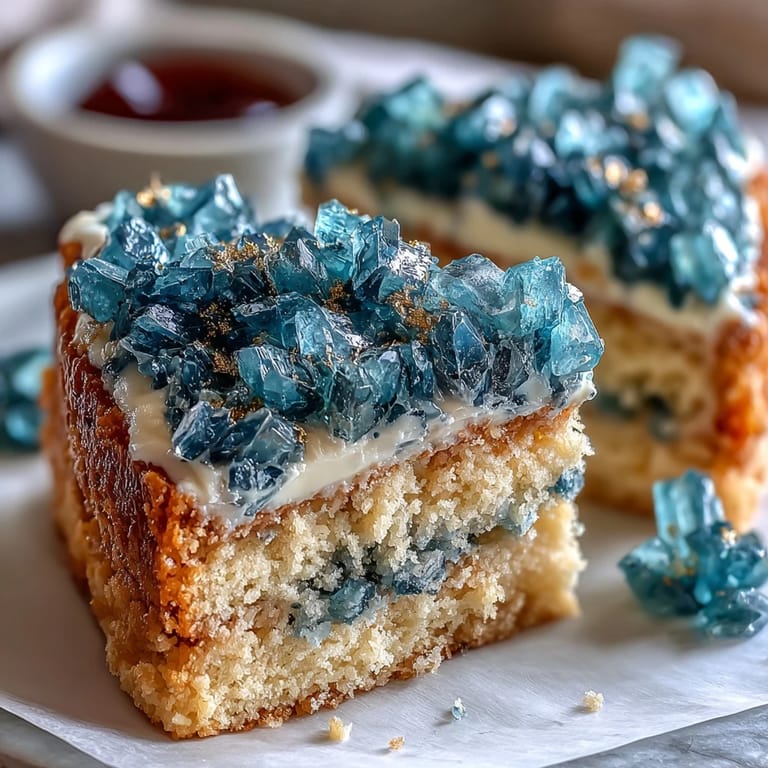
Save The first time I made a geode cake, the kitchen looked like a gemstone mine gone wild with sugar crystals everywhere. It’s funny how the teal food coloring seeped not just into the sugar, but also onto my fingers, my apron, and somehow even my phone. The excitement bubbled up as I saw the gold accents shimmer under the afternoon sun streaming in through the window. There’s a unique moment when you realize a cake is more than dessert—it’s a centerpiece, and this graduation version is a celebration in itself. Making the design felt like sculpting edible art, and even my skeptical brother was drawn in to watch the process unfold.
Last year, my cousin graduated and insisted on a cake that reflected her personality—bold, bright, and a little theatrical. As we pieced together the teal sugar crystals, she narrated tales from her college days, and laughter became another ingredient sprinkled between layers. I still remember the way the gold leaf glistened while we debated whether the geode should be deeper or more subtle. That afternoon, we lost track of time, turning the kitchen into a place of storytelling and joy. When the cake was finally ready, her beaming smile said everything.
Ingredients
- All-purpose flour: Gives the cake its structure, so weigh carefully for the fluffiest crumb.
- Baking powder: Ensures an airy rise—double-check freshness for best results.
- Salt: Just a pinch sharpens flavors and balances the sweetness.
- Unsalted butter: Room temperature is key for smooth blending—if too cold, the batter won’t cream properly.
- Granulated sugar: The sweetness sets off the vanilla—creaming it well produces a lighter cake.
- Eggs: Add richness and structure; always start with room temperature eggs for easier mixing.
- Vanilla extract: This aroma transforms the cake, and fresh extract is worth the splurge.
- Whole milk: Full-fat milk keeps layers tender—don’t substitute unless needed.
- Powdered sugar: Sift it before mixing for the silkiest buttercream.
- Heavy cream or milk: Just enough to adjust buttercream texture; add gradually.
- Teal gel food coloring: The concentrated color gives the buttercream and geode a dazzling hue—start with drops and mix as you go.
- Rock sugar crystals: Clear crystals work best; dye them teal in batches and let dry for crunchy texture.
- Edible gold leaf or gold luster dust: Gold’s shimmer is easiest applied with a brush dipped in clear liquor.
- Simple syrup (optional): Brushing layers keeps the cake extra moist, especially when decorating in advance.
Tired of Takeout? 🥡
Get 10 meals you can make faster than delivery arrives. Seriously.
One email. No spam. Unsubscribe anytime.
Instructions
- Bake the Vanilla Layers:
- Preheat the oven and prepare your pans, then whisk together your dry ingredients. As the butter and sugar blend into a pale, creamy mass, the kitchen fills with vanilla and anticipation—combine everything gently to avoid overmixing.
- Mix Up the Buttercream:
- Whip the butter until fluffy, then add powdered sugar in slow bursts—clouds of sweetness might just hover over your countertop. Once silky and smooth, tint most of the buttercream teal and reserve a portion for the crumb coat.
- Tint the Sugar Crystals:
- Pour sugar crystals into a bowl and let teal gel food coloring transform them; mix until each crystal glows like a precious stone. Spread them on parchment so they dry and don’t stick together.
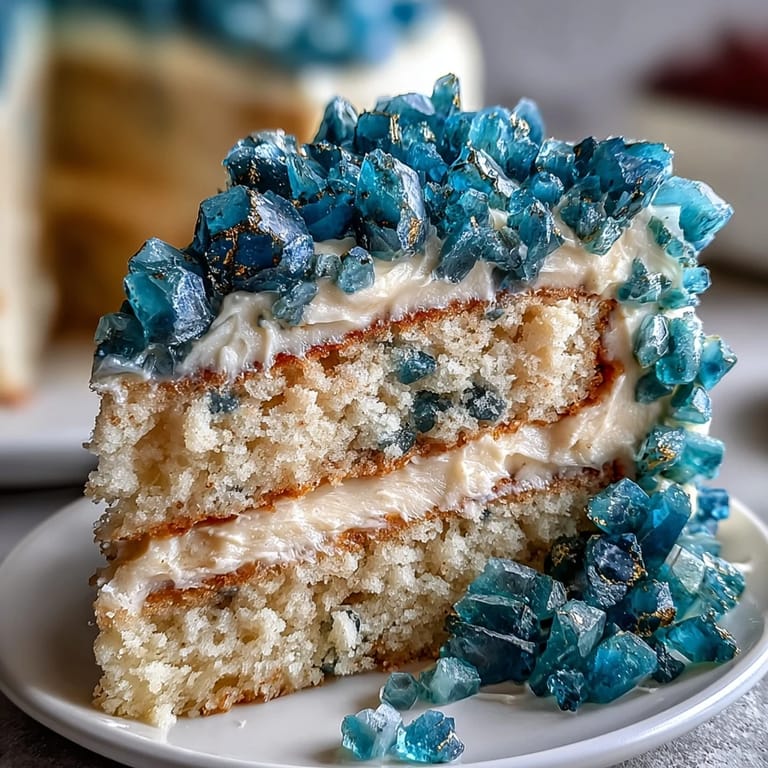
- Assemble Cake Layers:
- Level the cakes and brush with simple syrup if you want extra moisture; spread thin buttercream layers between each and stack them carefully. Apply a crumb coat with uncolored buttercream, then chill to set before smoothing on teal buttercream for that jewel-like finish.
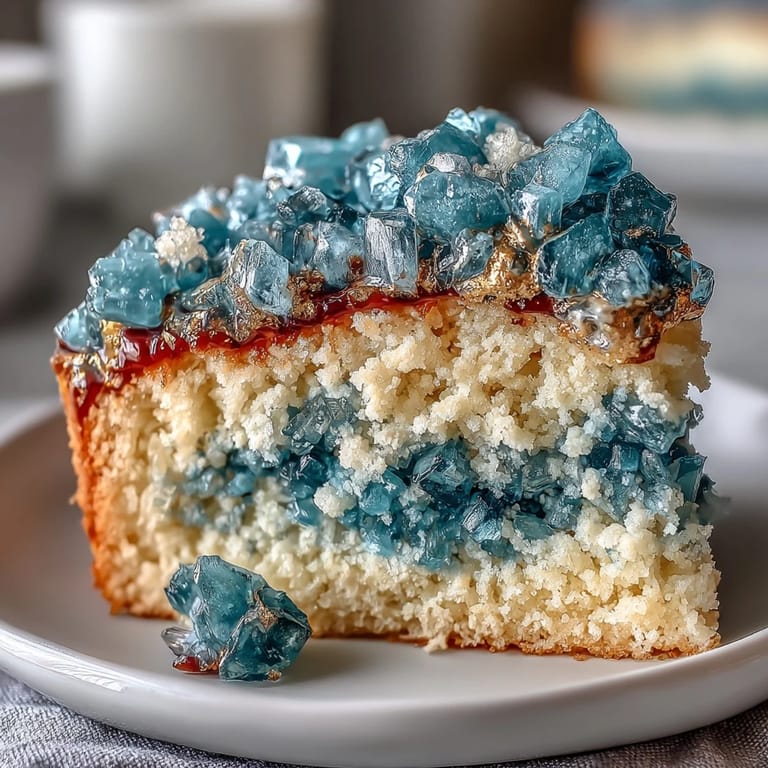
- Sculpt the Geode Slice:
- Carve a wedge through the side of the cake to resemble a natural geode opening, exposing the layers inside. Smooth buttercream within the cut and press in the tinted sugar crystals, blending from light to dark for depth, then finish with gold leaf around the edges.
- Decorate and Celebrate:
- Add extra gold accents wherever inspiration strikes and place a graduation topper for flair. Stand back and admire—this cake is ready to make memories.
 Save
Save When everyone gathered for the graduation party, there was a hush as I brought out the finished cake, and suddenly a chorus of “wow!” filled the room. It wasn’t just the cake itself, but the meaning woven between each step—every slice celebrated years of achievement and the bonds formed along the way.
How to Choose the Right Food Coloring
Gel food coloring gives a deeper hue without thinning the buttercream or clumping sugar crystals. I learned after a few duds that liquid coloring never achieves the same brightness or stability.
The Magic of Rock Sugar Crystals
Rock sugar isn’t just decorative—it provides crunch and sparkle that transforms your geode from pretty to dazzling. When colored properly and allowed to dry, it mimics authentic gemstone texture.
Celebratory Presentation Tricks
Presentation makes the cake unforgettable; placing the geode slice towards your guests and lighting with candles or a centerpiece spotlight elevates the theatrical effect.
- If you use gold dust, mix with a splash of vodka for paintable consistency.
- Chill your cake before transporting to keep decorations crisp.
- Slice straight through the geode for dramatic serving.
 Save
Save This teal and gold geode cake is more than a graduation centerpiece: it’s a memory in the making, just waiting to be shared and celebrated. Next time, I’ll use even wilder colors—there’s always a new gemstone to create!
Recipe FAQs
- → How do you achieve the geode effect on the cake?
By carving a slice out of the cake, applying buttercream, and pressing colored sugar crystals to mimic a geode, then brushing gold leaf around the edges for realism.
- → What flavors can be added for variation?
Lemon or almond extract can be incorporated into the batter for unique flavor twists, complementing the vanilla base.
- → Can this cake be prepared ahead of time?
Yes, both cake layers and buttercream can be made in advance. Assemble and decorate the day of the event for optimal freshness.
- → What tools are essential for decorating?
An offset spatula, electric mixer, parchment paper, serrated knife, and food-safe paintbrush are crucial for smooth assembly and detailed decoration.
- → Are there dietary considerations for this cake?
It contains wheat, eggs, and dairy. Check sugar and coloring labels for possible nut traces if allergies are a concern.
- → How many servings does the cake yield?
The finished cake yields about 16 servings, ideal for celebration gatherings.