Save
Save My friend texted me at midnight asking if I could bake her graduation cake. Not just any cake—she wanted something that looked like her four years compressed into layers, each one a shade darker than the last, representing her journey from freshman to senior. I'd never attempted an ombre cake before, but there was something poetic about the challenge. Two days later, standing in my kitchen with four pans and gel food coloring bottles lined up like tiny paint tubes, I realized this cake wasn't just about celebrating her milestone—it was about proving to myself that beautiful things are worth the effort.
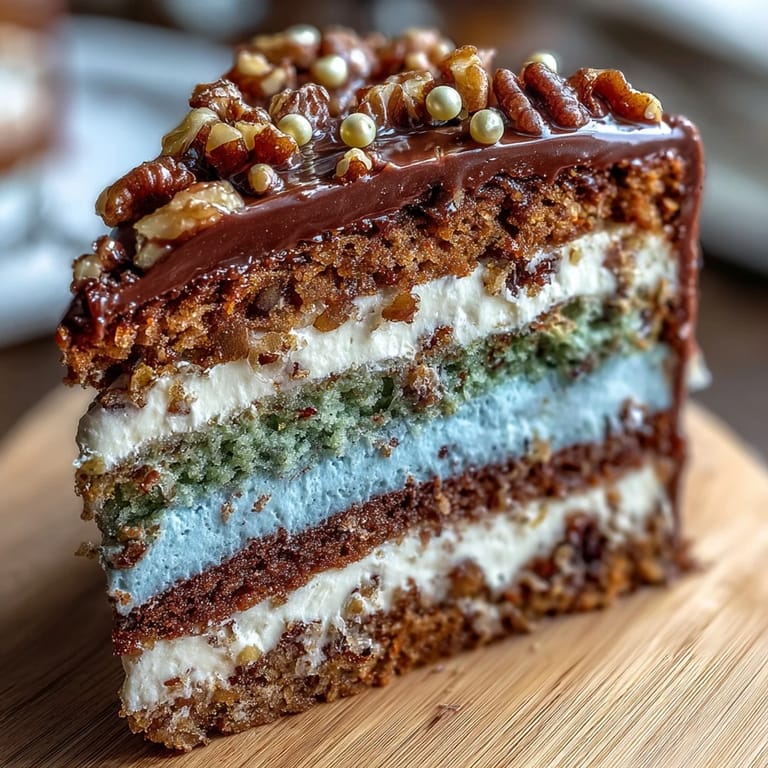
Watching her face when she first saw those graduating shades of blue fade from navy to pale sky took my breath away. Her friends gasped. Her mom cried a little. And I realized in that moment that baking isn't really about perfectly risen cakes or picture-perfect frosting—it's about creating a memory that tastes like someone believed in you. That cake sat in the center of her graduation party table for hours, and by the end of the night, only crumbs remained.
Ingredients
- All-purpose flour: The foundation of structure; make sure it's fresh and properly measured by spooning into your measuring cup rather than scooping straight from the bag, which compacts it and can make your cake dense.
- Baking powder: Your leavening agent that ensures the cake rises evenly across all four layers; double-check the expiration date because old baking powder won't give you that tender crumb.
- Salt: A pinch that amplifies sweetness and prevents the cake from tasting one-dimensional.
- Unsalted butter, softened: Softened butter creams more easily with sugar, creating the airy texture that makes this cake light rather than dense; take it out of the fridge 30 minutes before you start.
- Granulated sugar: The sweetness and structure builder; don't substitute brown sugar as it will change the flavor profile and the ombre effect.
- Room temperature eggs: Cold eggs won't emulsify properly with the butter, leading to a grainy batter; this single detail transforms a mediocre cake into a tender one.
- Vanilla extract: Pure vanilla is worth the extra cost here because it shines through in a simple cake.
- Whole milk, room temperature: Temperature matters more than you'd think; cold milk can seize the batter and create lumps.
- Gel food coloring: Essential for the ombre effect—gel coloring is highly concentrated, so a tiny drop goes a long way, whereas liquid coloring requires so much volume it thins your batter.
- Egg whites and sugar for buttercream: These create a stable, silky frosting that's less grainy than American buttercream and holds decorations beautifully.
- Unsalted butter for buttercream: Slightly softer and more spreadable than salted butter, and it won't conflict with the sweetness of the cream.
Tired of Takeout? 🥡
Get 10 meals you can make faster than delivery arrives. Seriously.
One email. No spam. Unsubscribe anytime.
Instructions
- Set your stage:
- Preheat your oven to 350°F and grease four 8-inch round pans, lining them with parchment paper so your layers release cleanly. Having everything prepared before you start mixing is the difference between flowing through this recipe and feeling rushed.
- Build the dry team:
- Whisk flour, baking powder, and salt together in a medium bowl; this aerates the flour and distributes the leavening evenly. Sift if your flour feels particularly compacted, but whisking is usually sufficient.
- Cream the butter and sugar:
- Beat softened butter and sugar together for 3 to 5 minutes until the mixture is pale, fluffy, and looks almost mousse-like; this process incorporates air that helps your cake rise. If your butter is still too cold, it will be grainy rather than creamy.
- Incorporate eggs gently:
- Add eggs one at a time, beating well after each addition so the emulsion stays stable; rushing this step or adding all eggs at once can result in a separated, curdled batter. Take your time—it's only four eggs.
- Marry the mixtures:
- Alternate adding the flour mixture and milk to the butter mixture, starting and ending with flour, mixing until just combined; overmixing develops gluten, which makes the cake tough and rubbery. Stop as soon as you don't see streaks of flour.
- Divide and tint:
- Split the batter into four equal portions and add gel coloring to each, starting with just a toothpick dab in the lightest batch and increasing gradually for the darker shades. Stir gently until the color is uniform, and remember that colors often deepen during baking.
- Fill and bake:
- Pour each colored batter into its prepared pan and smooth the tops with an offset spatula; bake for 22 to 25 minutes until a toothpick inserted in the center comes out clean or with just a few moist crumbs. Don't open the oven door before 20 minutes or you'll deflate your work.
- Cool with patience:
- Let the cakes rest in their pans for 10 minutes—this helps them set and prevents them from falling apart—then turn them out onto wire racks to cool completely. Frost a warm cake and your buttercream will melt into puddles.
- Make Swiss meringue buttercream:
- Whisk egg whites and sugar together in a heatproof bowl over simmering water, stirring constantly until the sugar dissolves and the mixture reaches 160°F on an instant-read thermometer. This step pasteurizes the eggs and ensures food safety.
- Whip to clouds:
- Transfer the mixture to a stand mixer and whip on high speed for 10 minutes until stiff peaks form and the bowl feels cool to the touch; this creates the silky, stable texture that makes this buttercream so superior. Don't skip the cooling time or your butter will melt into a greasy mess.
- Add butter gradually:
- Add softened butter a few cubes at a time, mixing between additions; if the buttercream looks curdled or broken, keep mixing and it will come together. This usually happens if the meringue was too warm when you started adding butter.
- Season and color:
- Stir in vanilla extract and divide the buttercream into portions if you want to create an ombre frosting effect. Tint each portion with gel coloring, starting light and working toward darker shades to match your cake layers.
- Level your layers:
- If your cake layers domed on top, use a serrated knife to gently trim the tops flat so they stack evenly; this creates a more professional presentation and ensures stable stacking.
- Build the tower:
- Place your darkest layer on a cake stand, spread with buttercream, and repeat with the remaining layers from darkest to lightest, so the ombre gradient flows upward. This order creates the most visually striking effect.
- Crumb coat:
- Apply a thin layer of buttercream over the entire cake and chill for 20 minutes; this seals in any stray crumbs so your final frosting looks smooth and professional. This step separates homemade cakes from bakery-quality ones.
- Final frosting:
- Apply the final layer of buttercream, using an offset spatula to blend the colors in a swirled ombre pattern if desired. Smooth, swirl, or create peaks depending on your vision—there's no one right way.
- Decorate and chill:
- Top with edible pearls, a graduation cap topper, or piped details, then chill the cake until set. Bring it to room temperature for about 30 minutes before serving so the flavors shine through.
 Save
Save Months later, my friend sent me a photo of her holding a slice of that cake at her college dorm, surrounded by new friends who had no idea the story behind the ombre layers. But she did. She told them it was made to represent her journey, and suddenly it meant more than just dessert—it was proof that someone had spent time, thought, and care on something permanent for her milestone. That's the magic of a cake made by hand.
The Art of Layering Color
The magic of an ombre cake lives in the subtle gradation of color from one layer to the next. Start with your lightest shade—sometimes just untinted batter—and increase the gel coloring in tiny increments for each successive layer. A toothpick dab can be the difference between an elegant gradient and a jarring color jump. The most common mistake is using too much coloring too soon, so I recommend adding color with a cocktail stick rather than drops.
Why Swiss Meringue Buttercream Wins
American buttercream is quick and easy, but Swiss meringue buttercream tastes like silk feels. It's less sweet, more stable, and holds its shape beautifully on a cake that might sit out for a few hours at a party. The egg whites are heated to 160°F, which pasteurizes them safely, and the result is a frosting that's silky enough to pipe delicate details but sturdy enough to support edible decorations without sagging. Once you master this frosting, you'll never go back.
Timing and Temperature Hacks
Temperature control is the silent hero of this recipe that nobody talks about until something goes wrong. Room temperature eggs, milk, and butter emulsify together smoothly, creating a tender crumb that stays moist. A cold egg or cold milk can cause the batter to split and become grainy, leading to a cake that's dry and dense. Take ingredients out of the fridge 30 minutes before baking—this tiny detail changes everything.
- If your buttercream looks curdled or broken, resist the urge to start over; just keep mixing on medium speed and it will come back together.
- Chill the frosted cake for at least 20 minutes before the final frosting layer so the crumb coat sets and won't tear when you add the top coat.
- Bring the finished cake to room temperature for 30 minutes before serving so the flavors are vibrant and the texture is tender rather than cold and dense.
 Save
Save This cake has become my go-to for celebrations because it promises both beauty and substance—something worth the effort, something worth remembering. Bake it with intention, serve it with pride, and watch how a dessert becomes a moment.
Recipe FAQs
- → How do I achieve the perfect ombre gradient?
Divide the batter evenly and gradually increase gel food coloring in each portion for a smooth color transition.
- → What is Swiss meringue buttercream and why use it?
Swiss meringue buttercream is made by gently heating egg whites and sugar before whipping to stiff peaks, creating a light, silky frosting that is less sweet and holds shape well.
- → Can I substitute gel food coloring with liquid color?
Gel food coloring provides more vibrant colors without altering batter consistency; liquid color may thin the batter and produce less vivid shades.
- → How should I store the finished cake?
Refrigerate the assembled cake in an airtight container to preserve freshness, then bring to room temperature before serving for best texture and flavor.
- → What tools are essential for assembling this cake?
Use round cake pans, mixing bowls, a mixer, offset spatula, piping bags, and decorative tips to achieve clean layers and smooth frosting.